I decided to post this after investigating how to use these templates in our demo room setup. You would think it’s straight forward but it appears the deploycluster tool, used to deploy these templates, is not yet compatible with OVM 3.3.1 and higher. That surprised me because it has been out for 3+ months now and with Oracle putting the emphasis on templates, it is strange that they do not work out of the box with the 2 most recent OVM versions. ( 3.3.1 & 3.3.2 )
Preparing the template
Let’s start with preparing everything for deployment
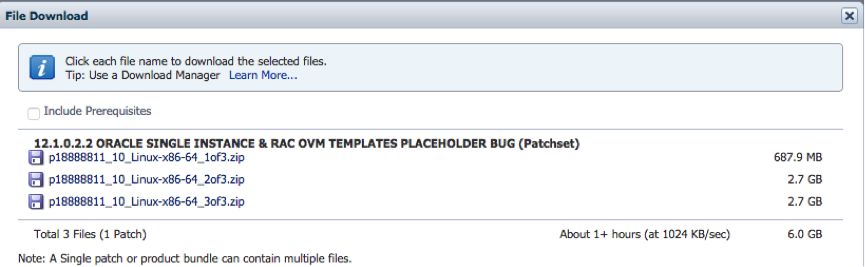
- Download the template on oracle support patch nr: 18888811

- Unzip the 3 files resulting in 3 *.gz files
- Join file 2A and 2B together
(root) # cat OVM_OL6U6_X86_64_12102DBRAC_PVM-2of2-partA.tar.gz OVM_OL6U6_X86_64_12102DBRAC_PVM-2of2-partB.tar.gz > OVM_OL6U6_X86_64_12102DBRAC_PVM-2of2.tar.gz
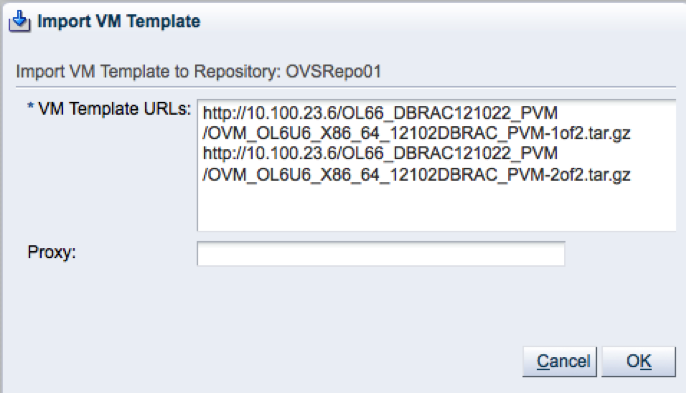
- Place file 1 and the newly joined file 2 on a webserver ready for import into OVM.
- Import the template

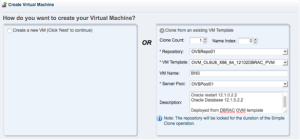
Creating the VM
Follow the readme to create a VM, I decided to use 2 ASM disks in 1 diskgroup instead of the minimum of 5. I’m also deploying the oracle restart and not the RAC at this time.
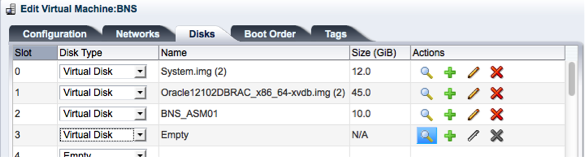
- Create the disks needed for ASM

- Create the VM based on the template
- Edit the VM and remove a network card, the second card is normally for interconnect in a rac deployment.

- Add the newly created disks to the VM


Deploying it with deploycluster tool
- Download the DeployCluster Tool
- Place it on any linux machine, I normally place it on the OVM manager because of why not.
- Configure netconfig.ini, start the VM and run the tool
(root) # ./deploycluster.py -u admin -p password -M BNS -N netconfig.ini
INFO: Oracle VM Client  (3.2.9.746) protocol (1.9) CONNECTED (tcp) to
      Oracle VM Manager (3.3.1.1065) protocol (1.10) IP (10.100.23.6) UUID (0004fb00000100008948135041eef83e)

ERROR: This deploycluster.py version (v2.1.0) does not support connecting to Oracle VM Manager higher than 3.2; found Oracle Manager version 3.3. See My Oracle Support Note #1185244.1 and OTN for deployment options on this version.
So we see here there is a problem with compatibility. If we go to the mentioned note we see :
The Deploycluster tool currently only supports Oracle VM version 3.2 and below
Manual or Message based deployment is possible on Oracle VM 3.3.1
But no guidelines on manual deployment.
Deploying it with message based or manual deployment
- Download and install ovm_utils on the ovm manager ( Patch: 13602094 )
- Boot the VM and send the necessary messages ( or open console and do it manually ), KEYS :
- com.oracle.racovm.netconfig.arguments => “-n1”
- com.oracle.racovm.netconfig.contents.0 => send the content of netconfig.ini, this is for initial network setup
- com.oracle.racovm.params.contents.0 => send the content of params.ini, we’ll leave this empty for now
- com.oracle.racovm.racowner-password => password for oracle user
- com.oracle.racovm.racowner-password => password for grid user
- com.oracle.linux.root-password => password for root user
- com.oracle.racovm.netconfig.interview-on-console => NO ( do not boot with the rac interview screen )
Results in :
export CMD="/u01/app/oracle/ovm-manager-3/ovm_utils/ovm_vmmessage -h 10.100.23.6 -u admin -p password -v BNS"

$CMD -k "com.oracle.racovm.netconfig.arguments" -V "-n1"
$CMD -k "com.oracle.racovm.netconfig.contents.0" -V "
# Sample Single Instance or Single Instance/HA (Oracle Restart)
NODE1=BNS
NODE1IP=10.100.23.161
PUBADAP=eth0
PUBMASK=255.255.255.0
PUBGW=10.100.23.254
DOMAINNAME=labo.exitas  # May be blank
DNSIP=10.100.23.20
CLONE_SINGLEINSTANCE_HA=yes  # Setup Single Instance/HA (Oracle Restart)"
$CMD -k "com.oracle.racovm.params.contents.0"  -V ""
$CMD -k "com.oracle.racovm.racowner-password" -V "oracle"
$CMD -k "com.oracle.racovm.gridowner-password" -V "oracle"
$CMD -k "com.oracle.linux.root-password" -V "ovsroot"
$CMD -k "com.oracle.racovm.netconfig.interview-on-console" -V "NO"
- Run the script and the machine will boot with a complete functional network
- Logon as root with the previous specified password
- Open /u01/racovm/params.ini and modify it for our environment, this file is very well commented and clearly explains every parameter, go wild 😉
- Change GIHOME and DBHOME ( do not forget to move the clone files on the vm aswell if you change it )
- Change the ASM settings, because we work with 2 disks
RACASMDISKSTRING="/dev/xvd[c-d]1"
ALLDISKS="/dev/xvdc /dev/xvdd"
ASM_MIN_DISKS=2
- Change DBNAME and SIDNAME
- When you are done, perform the build :
# ./buildsingle.sh
Are you sure you want to install Single Instance/HA? YES
Do not run if software is already installed and/or running.. [yes|no]? yes
...
INFO (node:BNS): This entire build was logged in logfile: /u01/racovm/buildsingle.log
2015-03-13 05:20:11:[buildsingle:Done :BNS] Building 12c Single Instance/HA
2015-03-13 05:20:11:[buildsingle:Time :BNS] Completed successfully in 1052 seconds (0h:17m:32s)
That’s it, We deployed a VM with Oracle Restart and a 12c database with ease.
